Ever had your vehicle suddenly die while you were driving it and leave you on the side of the road? In many cases, the cause is a malfunctioning alternator.
This critical part is responsible for charging your battery and powering electrical systems when your engine is running. Without it, you ain’t going nowhere quickly. It can also prevent you from struggling for hours just to get the car started in the morning.
Whereas professional mechanics have specialized equipment, basic home alternator tests require very few tools. This article describes testing your alternator by disconnecting your battery a technique that can, if done correctly, provide you with a lot of information about your vehicle’s electrical health.
Contents
- 1 Why Test an Alternator?
- 2 Procedure on How To Test Alternator By Disconnecting Battery
- 2.1 Step #1: Pull Over to a Safe Place to Park
- 2.2 Step #2: Power Down the Engine & Gather Equipment
- 2.3 Step #3: Place a voltmeter on the battery terminals
- 2.4 Step #4: Start the Engine and Take Initial Reading
- 2.5 Step #5: Test Isn’t The Alternator Output
- 2.6 Step #6: Run-Down the Motor to Various RPMs
- 2.7 Step #7: Check Voltage Readings
- 3 Alternative Testing Methods
- 4 Safety Precautions
- 5 Conclusion
Why Test an Alternator?
Like the electrical heartbeat of your car, the wiring requires regular maintenance to avoid catastrophic failure.
An alternator maintains power to your battery and supplies electricity to your vehicle’s electrical components. When it’s beginning to fail, you may notice dimming lights, odd noises coming from the engine bay, or a struggle getting your car to start.
Testing your alternator is another way to identify issues before you end up stuck. Regular testing will also prolong the life of your battery and other electrical components – as well as keeping them supplied with the correct voltage.
While average alternators can last between 80,000 and 150,000 miles, changing driving conditions and electrical demands may reduce their life.
Procedure on How To Test Alternator By Disconnecting Battery
Alternator test using a multimeter and exceptional coil test Using coil meter This hands-on approach helps you determine the performance of your alternator without any fancy tools.
Step #1: Pull Over to a Safe Place to Park
Look for a flat, open space free of traffic, where you can work safely.
Before you start working on your vehicle’s electrical system, safety needs to come first. Well-ventilated area: If you can, park in open areas where it’s well-ventilated and also in level ground.
Ensure you are clear of materials that can combust, as well as have enough room to maneuver the gear around the vehicle. As this is a running test, you’ll want to do this with appropriate ventilation to avoid carbon monoxide buildup.
Step #2: Power Down the Engine & Gather Equipment
Grab your tools, and make sure you battery has been disconnected completely.
And, turn off your engine and take the key out of the ignition, before you start the test. You’ll need some simple tools — a wrench or a socket set to disconnect the battery terminal and, if possible, a voltmeter to assess electrical output. Some works with gloves and safety lenses, too, just a precaution.
Make sure you know where your ions are with the battery location and terminal orientation.
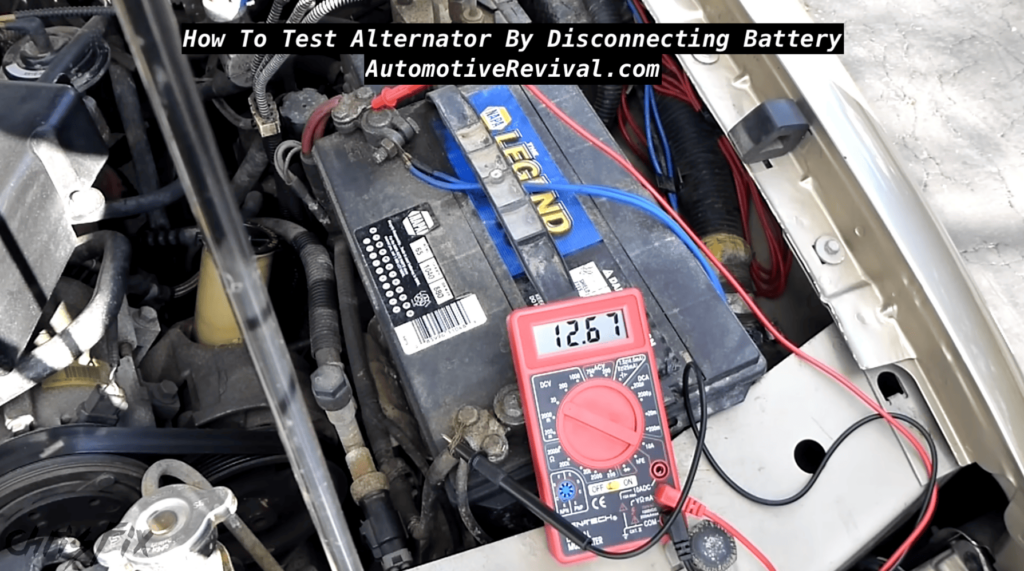
Step #3: Place a voltmeter on the battery terminals
If connected properly, it provides an accurate reading of the health of your electrical system.
If using a Volt meter, select the DC Volts (most likely the 20V range). Hook up the positive (red) lead to the positive terminal on your battery and the negative (black) lead to the negative terminal.
Ensure the connections are firm, but don’t overtighten. The resting voltage of the battery should now be read by your voltmeter, which should fall somewhere between 12.5–12.6 volts for a healthy battery.
Step #4: Start the Engine and Take Initial Reading
The second step — the one that happens when you first start your car — engages the alternator and provides you with baseline performance data.
Start the engine and let it idle for a minute or so. With the engine running and all electrical accessories off, note your voltmeter reading.
When working normally, the voltage should be between 13.8 and 14.6 volts. This increased voltage shows that the alternator is supplying energy to the battery.
Write down this reading — your initial reading, in order to compare with the next steps.
Step #5: Test Isn’t The Alternator Output
It’s here where the real disconnection test takes place to test alternator performance.
While your engine is still idling, turn off all electrical components used: Lighting, radio, and air conditioning. With your wrench, slowly loosen the nut on the negative battery cable.
Just try very hard to keep the wrench from touching any metal parts of the car or the positive terminal. Gently disconnect the negative cable from the battery terminal and see what happens to the engine.
Step #6: Run-Down the Motor to Various RPMs
Testing the alternator at various loads Changing engine speeds.
If the engine continues to run after the negative battery cable is removed, either the engine needs to be revved to another RPM range.
This checks the operation of the alternator as loads change. The engine should take a steady stream of operations from here on out. If it stumbles or dies when you rev it, then this could be an alternator issue.
As you did this test, keep an ear out for strangeness or variability in engine performance.
Step #7: Check Voltage Readings
Your test findings gauge your alternator’s status.
If your engine kept running nicely during the test, then your alternator is doing its job. If the engine died as soon as you disconnected the battery, though, it likely means your alternator isn’t generating enough current.
For more accurate analysis, reattach the battery, and, at various speeds, use your voltmeter to see what voltages are present. At various RPM ranges, healthy readings should remain between 13.5-14.5 volts.
Alternative Testing Methods
And these techniques work well, too, when you can’t disconnect.
Using a Multimeter
This will give you a more granular view of what’s happening with your electrical system.
A multimeter is more capable than just removing a battery. To check your alternator using a multimeter, you would set it to a DC voltage, attach it to your battery terminals.
Measure with the engine off (12.4-12.6V should read) and then with the engine running (14-14.5V should read) You can even test with accessories on to see how the alternator responds to loads.
It is a safer approach for modern vehicles that are equipped with sensitive electronics components that can be damaged if the battery is disconnected while the engine is running.
Professional Diagnostic Tools
Occasionally, industrial-quality devices deliver the best determination of alternator condition.
Many professional mechanics have high-tech diagnostic systems, such as alternator test benches that can simulate load conditions. These tools are capable of catching subtle problems that DIY inspections might miss.
Free Alternator Testing: Some of the local auto parts stores have a special machine that can test your alternator using professional equipment to see if it’s functional.
For newer vehicles that include computer controlled charging systems, professional testing is usually your safest and most accurate option due to the advanced communication protocol (between the alternator and the vehicle computer) required.
Safety Precautions
Because electrical testing can be dangerous, and taking a shortcut, however small, can result in damage, injury, or death.
This section discusses how to work with electrical components.
It prevents shocks and shorts, and damage to sensitive electronics.
Insulated gloves should always be worn when working on your vehicle’s electrical system. That is one reason never to remove the positive terminal when the engine is running because this can create dangerous high voltage spikes and damage to electronic components.
Insulate metal tools and do not let them inadvertently connect terminals. Keep working in drier conditions to limit shock risks. Modern vehicles have pretty sensitive electronics that can be destroyed with the wrong kind of testing methods, so be careful.
Seeing a Therapist: When To Seek Professional Help
Realizing your limits can prevent you from making expensive mistakes and getting even yourself in risky situations.
For cars with a “smart” alternator that talks to the car’s computer system, DIY testing by disconnection could damage costly components.
Likewise, don’t attempt to work with electrical systems if you’re not comfortable doing so or don’t have the right tools; in those cases, call a pro.
Do not linger around such signs, they need to be addressed immediately and should be taken to a mechanic as soon as possible, burning smells, smoke coming from the alternator area or complete electrical failure when driving are indicators that electrical fault may exist.
Conclusion
Disconnecting your battery to test your alternator can tell you a lot about your vehicle’s electrical system, but it needs to be done safely and correctly.
This tip is most effective on older cars with simpler wiring. Professional testing tools are safest and most accurate for newer cars with computer-controlled charging systems. Regular alternator testing, as well as keeping an eye out for warning signs such as dimming lights or battery warning indicators, can help prevent duplicitous breakdowns and extend the life of the electrical components in your vehicle.
Keep in mind that working with automotive electrical systems always requires safety as the number one priority — if in doubt, seek professional help from a mechanic.
Leave a Reply